So you have your guitar in your hands and you’ve tuned it. Ready to play something that sounds like music?
Chords for guitar and any instrument in general, refer to when two or more notes are played at the same time. In the majority of popular western music certain kinds of chords are prevalent, and by learning these chords you will be able to play something on your guitar which will resemble music as we recognise it.
Before we introduce these chords its important to know how to read basic chord diagrams and guitar tab.
Below is a basic chord box diagram,
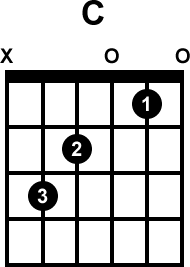
This is a diagram representing a portion of the guitars neck. The line on the furthest left represents the Low E string, the thickest string and closest to your face as you look down at the guitar. Each line going to the right represent each string there after. So the string furthest to the right represents the top E string, the thinnest string and one furthest from your face as you look down at your guitar.
The thick line at the top of the diagram represents the nut of your guitar. The horizontal lines running across the diagram represent the frets of your guitar. Now since the thick line at the top of the diagram represents the Nut, each line going down shows each fret in order. So for example, the horizontal line one down from the thick line at the top represents the 1st fret, the next line the 2nd, and the last line at the bottom the 3rd.
Basically and you’ve probably noticed, it’s just a picture of the top of your guitar neck.
Now we get to what to actually play. The black dots on the diagram indicate where on the neck and on which strings you need to press down on. The number in that black dot tells us what finger we need to use. Your index finger being ‘1’ and going down in order so that your little finger or pinky is ‘4’. If we look above the box we can see it telling us some more information.
‘X’s indicate this string isn’t played. And a ‘O’ tells us to play that string open.
Playing an open string means play that string without pressing that string down on any fret.
So if we look at that chord diagram again, firstly this chord is a C Major chord. All the information we need is shown in the diagram letting us know how to play this C Major chord.
Lets start with the low E string in the diagram and work our way down a string at a time.
Looking at the low E string we can see there is no black dot. Telling us we don’t need to press the string on any fret on this string. If we look we will also see a ‘X’ above the Low E. This tells us not to play this string at all. So for C major we can ignore the big Low E string.
Now lets move to the A string. First of all we can see a black dot between the 2nd and 3rd frets. This tells us the string needs to be pressed down onto the 3rd fret. Looking inside the dot we can see the number ‘3’ this tells us to use the 3rd finger to play this note. The 3rd finger being your ring finger.
Moving to the D string we can see we need to play the note of the 2nd fret using the 2nd finger. Along to the g string we can see we don’t need to play a note on any fret, but we do need to strike the string when playing the chord.
Moving to the b string we can see we need to play the note on the 1st fret using the 1st finger.
Now, all these things need to be done all at once. So using the three fingers indicated you need to press the indicated notes together at the same time.
Got it?
Now take you guitar pick or your fingers of your strumming hand, which ever you are using. And starting with the A string strum or drag your pick downwards from the A sting to the top E. Remember the diagram told us not to play the Low E string, which is why we started on the A.
How did it sound? Did it chime pleasantly and clearly? Listen to this example to hear how it should have sounded
If this is the 1st time trying it chances are something doesn’t quite sound right. It may sound muffled, or just plain wrong.
To find out the problem, hold the chord shape and hit each string individually. Does it ring clearly and strong? If it does, move on to the next string. If you do encounter a muffled or duff note usually one of two things are going wrong.
Firstly you may be pressing down on the string too far behind the fret indicated. Although the dot on the diagram shows you press a string down in between the frets you should aim to press down on the string close to the indicated fret. So the dot in between a 2nd and 3rd fret, you should aim to press the string down in between these two frets, but CLOSER to the 3rd. The closer the better, but NOT on top of. Pressing on the string too far back from the fret can result in not enough pressure giving you a weak or muffled note.
A very important point – With any note you press on the guitar, you only need to use LIGHT force or pressure. Pressing to hard will sharpen the note out of tune and also hurt your fingers! If you are finding the note doesn’t sound clearly unless you are pressing hard, move your finger closer behind the fret. If you are fingering the note close to behind the fret you will find you only need very light pressure to make firm contact between string and fret.
Remember aim for LIGHT pressure.
Another problem may be is that some part of your body is touching that string stopping it from ringing clearly. The main culprit is normally your other fingers. The fingers pressing the other notes you are aiming for are accidently touching on the other strings stopping them from ringing clearly. If this is happening then you are probably too flat on the strings. The fingers should arch around the neck not lay flat on. And you should be using the tips of the fingers not the flat area. To get that extra reach and arch try to lower your thumb position behind the neck. Try placing it in the middle of the arch of the neck.
Depending on the size of your hands and fingers and your guitar, you will need to shift your grip and fingers about, following the advice above until you get the chord to sound right. Once you get it sounding right a important thing to ask your self is,
Is this comfortable?
If your wrist or arm feels unnaturally bent and uncomfortable or tiring, then you need to adjust. Playing these chords, or anything on the guitar, should not cause any discomfort. If it does you need to adjust yourself until the chord
rings clearly and you experience no discomfort.
Keep at it until the C Major indicated in the diagram matches that in the sound example.
Now to introduce some other chords.
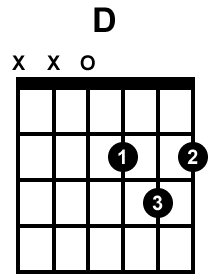
We’ve been shown the C major chord, so lets introduce a few other major chords:
Listen:
Once we’ve learnt how to play each chord try strumming the chord repeatedly. Start by playing the strings downwards.
By downwards we mean from the thicker strings towards the thinner strings.
When strumming the strings using either a pick or your fingers aim to keep the elbow and arm reasonably still and try to get most of the movement from the wrist.
Once you’re doing this comfortably try strumming in both directions. Once you strum downwards, instead of starting the next strum back at the top of the chord, travel backwards and strum back up. Doing this comfortably and smoothly can be surpassingly difficult to begin with.
Aim to keep you fingers and wrist as loose and relaxed as possible. And if you are using a pick don’t hold it too tightly, let’s it give way a bit as it runs through the strings. Hold it too tightly and you’re likely to get the pick snagged or hooked on the strings.
Now once we are comfortable holding and strumming a chord, here comes the really tough part. Changing quickly from one chord to another. You can try this your self. Pick one of the chords we’ve just learnt and now see how quickly you can change your fingers to leap to another chord. Even for the most skilled guitarists, this 1st step in learning the guitar can prove difficult. The only way to nail smooth and fast changes is to simple repeat and practice over and over again.
Don’t be discouraged if you find it difficult, we all did to begin with. Just trust the more you do it, the faster it becomes.
Exercises
These exercises use chord slash type diagrams.
Each horizontal segment represents a bar of music. If this doesn’t mean anything to you right now, don’t worry. Just remember that each of these segments should last exactly the same amount of time and for four beats.
So as you play your guitar or listen to music, tap you foot along to the music or nod your head. Each time you tap your foot or nod your head is one beat. So each of these segments, or Bars, should last four of these taps and beats.
So lets examine the a example diagram,
Often when referring to major chords, we only use the letter. So a ‘C’ on its own means C major. This is usually true in other books and resources not just these lessons.
So seeing this we would play G and start counting 1, 2, 3, 4. All the while still playing G. Play the first G exactly on the count of 1. See those ‘/’ marks after? those represent the following beats, 2, 3 and 4. This is telling us to keep playing the G through counts 2,3 and 4. You can time the chord to match
exactly on the beats only, or you can play the chord many more times on and in between the beats, or even pause for and not play the chord in places. The important thing is to recognise that it’s telling us to play a ‘G’ for 1 bar. 1 bar being 4 beats as indicated by the G plus 3 slashes. G being the first beat, and the 3 slashes afterwards indicating 3 more counts or beats.
How fast should you count? Unless it tells us, you can go as fast or as slow as you like.
So looking at the above diagram, we play G for 4 beats, then A for 4 beats.
If we see something like this,
We can see in the 1st bar, on the 3rd beat we need to switch to a A. So we need to play two different chords in the 1st bar. Also in the next bar we can see that on the 4th beat we need to switch to a ‘C’.
Remember to count smoothly and evenly, you shouldn’t be speeding up and slowing down. Don’t worry, this should come naturally and be automatic. If you prefer you can even use a metronome or drum machine to do the work for you.
Here are a few more examples to try playing,
This is one of the more easier changes to get since you don’t require much readjustment.
This one is slightly more difficult, in fact any of the chords we’ve learnt changing to the D chord is difficult to begin with. Try it again but switch the A chord for any of the others we’ve learnt.
Try to do this for yourself playing one chord for a single bar and then switching to another for a bar, then repeating. Do this with as many different combinations as possible.
Once you have got more comfortable with this try playing 2 chords in one bar switching on the 2nd beat. Or any other beat if your prefer.
Once you have a good command of switching the chords quickly, try playing these exercises bellow. These should only be attempted once you feel confidant.
This is how it should sound, I’m in time with each count, you can strum in whatever pattern you like so long as you play the chord for the length of time indicated. In the example we’re playing over a click track, this helps us keep in time.
Sound clip
And another
How it should sound, again I’m in time with each count,
Sound clip
These two exercises introduce all the Major chords we’ve learnt up to this point. But of course we haven’t gone into every single possible change possible. We’ll leave that up to you to experiment with. Try as many different changes as you can think of, also if a particular change seems very difficult, then give that change extra practice and effort.
Myself personally these chords where the first thing I learnt. And I remember trying to force my stubborn fingers to move from the A chord to the D chord. My mind said move, but the fingers shaking and rigid didn’t respond. I had to use my strumming hand to reach over and pry my inactive fingers off the A chord notes and place them onto the D chord notes.
That’s how bad I started.
But a few hours later I was wizzing in between the two with ease.
So in short, keep practising, you WILL get better!
Oh one more thing, if you are wondering why these chords are called what they are…don’t worry we’ll get to that later. For now just concentrate on playing them.