Major Barre Chords
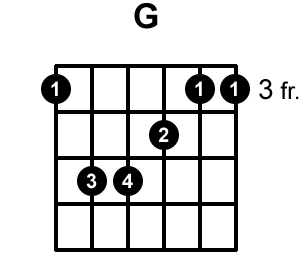
In a previous lesson titled ‘Chord basics’, we learnt how to strum basic songs using open chords. Those were played at the end of the fingerboard (nearest the head) and consisted of a mixture of open and fretted strings. Now, Barre Chords are very similar to the chords we already know, but they can be played anywhere along the fingerboard. Here are two basic barre chord shapes:
Fig. 3.1 – ‘E type’ barre chord in G
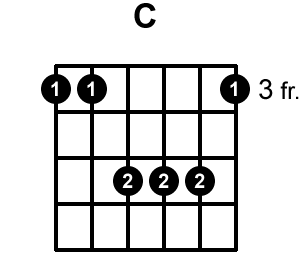
Fig 3.2 – ‘A type’ barre chord in C
Another way of fingering the ‘A’ type barre chord is by using only two fingers on the fretting hand (instead of four fingers). Although there is no absolute right or wrong method of fingering the chord, we find the 2-finger method more efficient and quicker to play in a song. As you can see, the 2nd finger is laid across the three strings on the 5th fret, at the same time, being careful not to disturb or press against the 1st string (which is fretted on the 3rd fret by the 1st finger).
Fig 3.2 – ‘A type’ barre chord in C (2 finger method).
As you may notice, the ‘E’ type barre chord is named as such because the shape of the chord is similar to the E open chord. And likewise, the ‘A’ type barre chord is similar to the A open chord. They are simply the same chord played further along the fingerboard with one finger laid across the strings forming a ‘barre’.
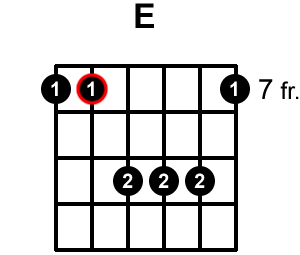
The root note of each chord is highlighted by a circle in the diagram. The clever bit is that wherever the barre chord is played on the fingerboard, the position of the root note determines the key of the whole chord.
The ‘E’ type barre chord has its root note on the 6th string. Whereas the ‘A’ type barre chord has its root note on the 5th string.
In the example above, we can see that the ‘E’ type barre chord has its root note on the 3rd fret of the 6th string. Using the chromatic scale, we know that the 6th string played on the 3rd fret is a G major. So, in short, the ‘E’ type barre chord played on the 3rd fret is simply a G Major chord.
The same (root note) principle can be used to deduce the key of ‘A’ type barre chords wherever they are played on the fingerboard.
You may notice that the chords B and F have not been covered in the ‘open chords’ lesson. This is because they don’t have an easily played open chord equivalent. There is no significant reason for this other than the way the strings are arranged on the fingerboard which doesn’t allow them to have easily played open chord equivalents. The solution is to just play the barre chord equivalent of those chords.
Also some chords such as the sharps and flats, such as F# (F sharp) for example cannot be played using a open shape. In these instances, although there are other ways to play chords like this, the easiest way is to use barre chords.
Another reason to use barre chords is that it can be easier to change chords fast. Since there is minimal change in shapes. Changing from the barre chord versions of A to G for example only requires us to move the same shape up the neck. Changing from open chord versions of G to A however requires re adjustment of the entire hand.
These examples have demonstrated how you can move a chord shape around the neck to create different chords. In these examples we’ve only used two shapes that we’ve moved. E major and A major. But we can also use the same principle with many other chord shapes. Particularly the minor versions of E and A again. Have a look at the minor barre chords lesson for more detail.
- A “Barre” is when we lay a finger, usually our index, across more than one string.
- Barre chords are a way of moving open chord shapes around the neck, to change the chord.
- If you know your chromatic scale you will easily be able to work out what these chords are when moved.
- Certain chord changes are faster and easier with barr echords.
- Some chords such as B and F major can more easily be played with a barrechord than any other type of fingering.


