Hammers, pull-offs and slides
Hammers, pull-offs and slides are all names of techniques we use on guitar to get that legato sound. Legato is Italian meaning tied together. In music this means notes flow smoothly together.
To get this smooth flowing sound on guitar, we use hammers, pull-offs and slides.
First lets have a look at hammers and pull-offs.
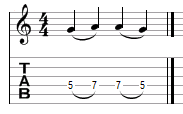
The small arch in the tab diagram linking the notes together tells us to use a hammer or pull-off. Let’s take a look first at the 5th fret g note of that D string. That note is linked with a small arched line to a note further up the neck, in this case an A note.
How do we play this?
Firstly finger that 5th fret g note, your first finger would be best. Then strike the note, we hold this note for as long as we need and then while the string is still ringing, without picking the string again, we use another finger to bring it down onto the 7th fret A note. In this example let’s use our middle finger.
It’s very important not to release that first note we played until AFTER that second note is played. When we press down on that 7th fret it should ring the note as clearly as if we had stuck the note. Only since we didn’t strike the note it should sound more mellow and smoother. And the two notes should sound as if they bled into one another. If we simply pick or strike both notes then both notes would sound individual and defined. But using this method they bleed smoothly into each other.
When we use this technique to move up in notes we call this hammering. Or a hammer-on. Sometimes tabs will have a small H next to that little arch to make it extra clear.
Now lets look at the next two notes. This time we go from an A note down to a G note. We are moving backwards along the neck. When we go back in this fashion it’s no longer a hammer but a pull-off.
To play a pull-off we need to have both notes fingered at the same time. In this example we would hold the 5th fret with our first finger, and at the same time hold that 7th fret with our middle finger. Or if you prefer, any other finger. Next we strike the string sounding the 7th fret A note. We hold the note for as long as we need and then we lift our finger off the 7th fret. When we lift off the 7th fret we’re still holding the 5th fret, so that 5th fret note should now ring out.
Pull-off notes can sometimes sound weaker than hammered notes. A good tip to get them to ring louder is too pull-off at a slight angle. By this we mean, instead of lifting it straight off away from the fret board, we lift our finger off at an angle moving slightly toward the floor. This in a way slightly flicks the string giving it a slight boost in energy to get the next note ringing stronger.
Hammers and pull-offs are very common in guitar playing in all styles of music. From folk and classical to blues and jazz, and all the way to rock and metal.
Now lets have a look at slides.
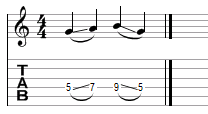
That line straight line linking two notes indicates a slide. This is a more simple technique to play. All we need to do is play the first note in a normal fashion, and then slide our fretting finger we used to play that note to the next note indicated.
So in the above example we would play that 5th fret g note, then slide our finger to the 7th fret A note. Along the way the 6th fret note will also sound. But for the tab notation we only need to write the first and last notes of the slide. After that, the diagram tells us to slide from the 9th fret down to the 5th fret. Since we are sliding downwards notice the diagonal line is slanted in the opposite direction.
The small arches in the above example tell us to play it legato style. Meaning, we don’t pick or strike the note at the end of the slide. Only the notes at the beginning of the slide.
Sometimes you might see slide in tab notation without the legato arches, like this,
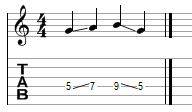
If we see an example like this, we do the exact same thing as the legato slides, only we strike all the notes. So after we slide to the note we need, unlike the legato slide, we strike the note we slide to as well.
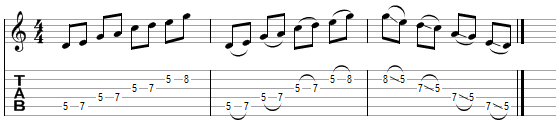
All the examples above we only looked at linking two notes together using hammers, pull-offs and slides. We can link many more notes together using these techniques. Lets look at an example.
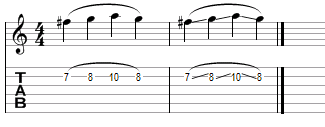
First lets look at the first bar. We need to strike the 7th fret F# note. Then hammer onto the 8th fret, hammer again onto the 10th fret and finally pull-off back to the 8th fret. The best way to do this is to use your first finger for the first 7th fret note, leaving you with plenty of fingers left to hammer and pull-off the other notes. Remember we only want to strike the 1st note covered by that arch.
In the second bar we see the same thing but this time using slides. Since we see that arched line we know it’s a legato slide. Meaning we only strike the 1st note.
You can listen to see how that example sounds.
Aside from using legato too get a smooth sounding transition from note to note. Often guitar players will use hammers and pull-offs to give the picking hand a rest occasionally, so we don’t have to pick every single note. Some guitar players use these techniques sparingly and like the strong sound of picked notes. While other guitarists base their whole sound around this smooth legato style.
Another technique we can come across is called a trill, and in tab notation will often look like this.
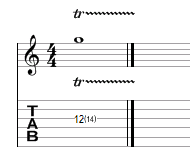
The ‘tr’ and wavy line tells use to use a trill. We start with the 12th fret g note on the g string. And the 14 in brackets is telling us to hammer and pull-off rapidly and repeatedly.
It should sound something like this,
Here is an example, which should demonstrate most of these new techniques and highlight the difference in using legato and picking all the notes.
The 1st bar we strike all the notes, the 2nd we’re using hammers and the last bar we’re using legato slides. We should be able to hear the differences in all these different methods.
Hammers and pull-offs can be difficult to get to ring clearly. And also when we remove the picking it can sometimes be difficult to keep in time. It can also be quite tiring on your fretting hand since we tend to press harder and use more muscle in the absence of picking.
Here is a good exercise to help build up timing and stamina when using legato methods. It’s very simple and is used by guitarists the world over, not just as an exercise but also for warming up.
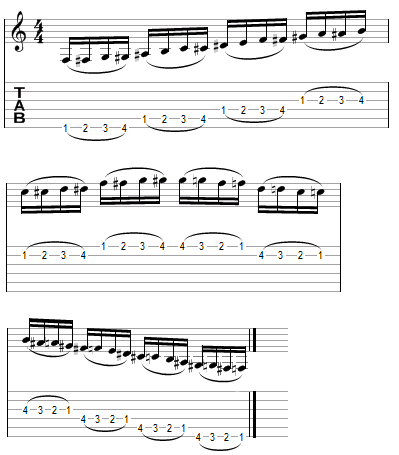
Try to aim to get all the notes sounding clearly and get the timing of each note even. Each note should last the same amount of time.
Lastly sometimes we may come across this type of slide.
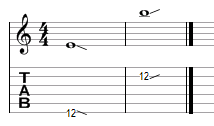
Unlike other slides we’ve seen before, we’re not told which note to slide toward. That’s because it doesn’t matter. Generally when we’re not told where to slide too, we just slide a good distance down or up the fret board and then release without stopping to hold a note.
The first bar in the example is typical of something we might hear before a guitarist launches into a riff or solo. The diagonal line slanting downwards lets us know to slide downwards.
The example in the 2nd bar slides upwards, and is typical of something a guitarist might do when ending a lick or solo.
They should sound something like this
All these techniques become second nature to a guitarist and as you develop your own style, how often you use these techniques will be a big part of what defines your style.
- Legato techniques make changing from one note to another sound smoother.
- The main legato methods on guitar are, hammers, pull-offs and slides..
- Concentrate on timing, when not picking it can be easy to get out of time.
- Legato requires some good hand stamina that can be built up over time.